
Get ready for spring with new outrigger lines.
By Gary Caputi
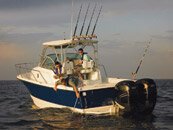
Outriggers are critical fishing gear for trolling that -- unlike rods, reels and lures -- are part of the boat. The easiest way to think of them is as a system consisting of three main parts: mounting hardware, poles and rigging.
Smaller boats utilize a pivoting mounting base that extends through the T-top or cabin roof with poles up to 18 feet in length. Larger craft require longer poles, up to 40 feet, that mount to the sides of the boat. The one thing they all have in common is the rigging, which can vary from one to three release lines per pole.
Each release line consists of a braided nylon cord or monofilament, a release clip and a lower pulley called a halyard, which is attached to the gunwale with a shock cord to maintain tension on the line. Rigging lines are subject to wear and degrade over time from exposure to sun and salt water. They should be examined regularly and replaced every couple of seasons.
When I replaced the outrigger lines on my boat last spring, I took the opportunity to correct a common problem — the tendency for the line and release clip to creep back toward the boat while trolling. To prevent it I tossed the old halyards and replaced them with Hal-Loks made by Marine & Outdoor Products Inc. (gotomop.com). They come in single-, double- or triple-line models and, as the name suggests, have a locking mechanism that prevents the line from moving once set in place.
I used 300-pound test (1.9 mm diameter) monofilament to replace the old line and made all the connections using 2 mm crimps. Plastic loop protectors were used to prevent chafing at contact points, and a plastic bead slipped on the line as a stop to keep the crimp from jamming in the upper pulley. All the components are readily available at tackle and marine supply stores, or you can purchase a prepackaged kit.
Start by putting the outrigger in the fishing position and pull the release clip down to the halyard. Cut the old line where it attaches to the top of the release clip and splice the new line to it with a crimp, tape or small knot that will fit easily through the pulley at the top of the outrigger pole. Pull the old line to the top and back down through the guides on the pole, then cut it away from the old line. Next, cut the old line off the bottom of the release clip.
Slide a bead or cork on the new line extending down from the top pulley followed by a crimp and pass it through one side of the release clip. Slip on the loop protector, pass the line back through the crimp and carefully compress it using a crimping tool. Slip the line extending from the bottom of the pole through the halyard pulley, which should still be attached to its anchoring point on the gunwale. Run it through the bottom loop on the release clip, pull the line tight so it is straining against the shock cord of the halyard and mark it. After cutting it to length, slip a crimp into the line, run it through the release clip, put on a loop protector and pass the end back through the crimp. Compress the crimp and you’re done.
Shared with Permission from MotorBoating.

